Are you looking for an easy way to record videos on your PC?
Recording videos is a great way to share yourself with the world, make memories, and entertain your friends. Even if you're new to recording videos, it's not that difficult with today's technology.
This practical guide will walk you through the whole process of recording video on a Windows PC. From selecting the right video recording software to making sure that every clip looks professional, this guide has all the information to help get you started. So, if you've been considering creating videos on your computer, read on and find out how to do it!
What You Need to Record Video on Computer
To record a video on a PC, you need to make sure that your computer has the necessary software components in place. First off, you will need a webcam or another type of video recording device attached to your computer.
There are several software programs you can use for video editing, for example, any video editors people use to create their YouTube video content.
Next, make sure your computer has enough memory and storage space to save the resulting videos as well as any other content used within them, like audio files.
Finally, ensure that your PC meets any additional requirements needed for the particular program you have chosen (for example, some programs may require an up-to-date graphics card).
2 Ways to Record Video on PC
Recording video on a computer can be a great way to create content, capture memories or keep a record of your processes when working on projects. Here are 2 ways you can record a video on a computer.
1.Using Screen Recorders
The best way to capture videos on your PC is through high-quality screen recorders. These screen recorders are incredibly useful tools for individuals and businesses alike. They allow users to record videos of their computer screen, which can be used for a variety of purposes, such as:
- Providing tutorials and demonstrations
- Recording software bug reports
- Documenting processes for future reference
- Making how-to guides
For our guide, we’ve picked Screen Capture, Bandicam, and Game Bar to show how video recording can be achieved on PC.
See Also: 6 Best Video Recording Apps for iPhone & iPad (2023)
Screen Capture
Screen Capture is an online screen recorder which will help you record your screen in a few clicks. You can use it to record webinars, tutorials, presentations, and more. It also allows you to separately capture your microphone, system sound, and webcam.

- Open your browser and search for the Screen Capture website.
- You will then be prompted to select the area you want to record, typically a specific window or region of the screen. You may also have the option to pick whether you wish to record full screen or set custom recording dimensions.
- Once you’ve selected the area, adjust any additional settings such as video resolution, audio quality, and frame rate before starting the recording process.
- After adjusting all necessary settings, click on the “Record” button to begin capturing video from your selected area of the screen. A countdown timer will appear before recording begins to give you time to prepare for your video before it starts capturing.
- When you are done filming, press the stop button. A window will pop up to allow you to download and save your recording at a designated location on your PC.
Bandicam
Bandicam is a feature-packed screen recorder for PC that can help you record any activity happening on your computer screen. This includes capturing gameplay, recording video tutorials, taking screenshots, and more.
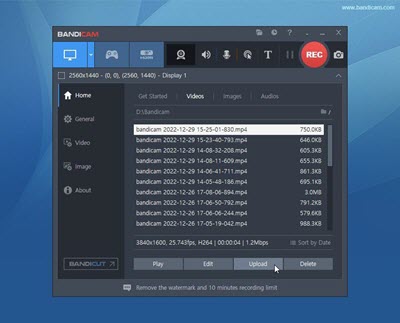
1. Download Bandicam and install it on your PC.
2. After installation, launch the program to open its main interface. Here you can customize the recording settings such as frame rate, resolution, codecs, and more.
3. To start recording, choose the area you want to capture and click the “Record” button. You can also select additional options such as adding your webcam to record yourself, or enabling mouse cursor highlighting.
4. Once you have finished recording, you can preview it by clicking the “Play” button on the main interface.
5. The last step is to save your video on your PC or upload it directly to YouTube and other platforms in the necessary format.
Game Bar
Game Bar is an in-built screen recorder in Windows 10 that allows users to record and share their gaming experiences. Game Bar is accessible within Xbox program and grants users access to features like video recording, taking screenshots, and even broadcasting their gameplay.

- Open the start menu and type “Game Bar” in the search bar. This will bring up the Game Bar Settings window.
- Click on “Record” in the left panel, and then turn on the “Record with Game Bar” toggle switch.
- Once you’re ready to record, press the Windows logo key + G to open the game bar interface, or press the Windows logo key + Alt + R to begin recording immediately.
- In the game bar interface, you can also click on the microphone icon next to the record button if you want to enable audio recordings along with your gameplay footage as well.
- Once you’ve finished recording, you can either click on “Stop” in the same game bar window or press the Windows logo key + Alt + R again to stop recording and save your file automatically.
2. Through a Webcam
Another way to record videos is by using a webcam that connects to your PC. The best webcams for PC include Logitech HD Webcam C270, Anker Powerconf C300, and Poly Studio P5. If you have a webcam and are not sure how to capture videos on your PC, follow this easy guide:
- Connect the webcam to your PC: First, plug the webcam into your PC. Usually, a USB port is used but other connections, such as HDMI, are possible. Once connected, a driver should be installed on your PC to recognize the webcam.
- Open the camera tool: Next, open the “Camera” tool from the start menu or the search box in Windows 10. You can also launch it by double-clicking on a camera icon in the system tray if there is one present.
- Adjust video settings: Click on the “Settings” icon and you can adjust various video settings like brightness, contrast, etc. if needed before starting your recording session.
- Start recording: To start recording, click on the “Start Record” button at the bottom of the screen and start talking for as long as you want to record video through your webcam. The video will be saved in MP4 format in your “Pictures” folder by default unless you specify another destination while making recordings.
- Stop recording: Once you're done with recording, simply press the “Stop Record” button at the bottom of the “Camera” window to save your recorded video file on your PC and close it so that it automatically stops any further recording process.
How to Record Video on Laptop
The method you use to record video on laptops is slightly different from recording footage on a desktop PC. Furthermore, the advantage of recording a video on a laptop is that there is already a camera installed on the screen and some devices have software preloaded.
Follow this easy guide to start recording a video on your laptop whether you’re using a Mac, HP, or Dell device:
- The first step is to open up your camera tool on your laptop device. The process may differ depending on your operating system, but for this example, we’re using Windows 10. The quickest way to find the tool is to type “camera” in the search bar at the bottom of your screen.
- Next, you may want to configure your settings. You can then toggle between photo and video modes faster.
- Adjust the settings of your microphone and webcam. Fix your brightness levels for more clarity and activate your microphone if you want to record sound or voiceovers.
- Click the record button to start recording your footage on your laptop. The recording will start immediately.
- Pause and stop the video when you need to use the available buttons. If you want different clips, use the pause option. This is ideal if you hope to take breaks in between your recording.
- You can then review your final results after recording by clicking on the icon at the bottom right of your window.
- Use Windows editing tools to adjust your clips or make changes. Your recording will automatically be saved to your device.
Final Thoughts
Recording a video on PC doesn’t have to be complicated or expensive. With the right tools and guidance, anyone can create outstanding videos quickly and easily. Record videos for meetings or to share your ideas. Whether you are a beginner or a professional, recording videos on your computer can be an enjoyable experience that will yield great results. With this practical guide as your reference, you should have no problem getting started with recording videos on PC – so go ahead and get creative!