VPN (Virtual Private Network) is a secure and encrypted connection that allows you to access the internet privately, away from prying eyes. With VPN, you can protect your online privacy and access restricted websites & apps (like textnow, Talkatone, Grindr, cash app) from anywhere in the world. If you are a MacBook user, you can easily set up a VPN connection and enjoy the benefits of a secure and private internet experience. In this article, we will guide you on how to connect VPN on your MacBook Pro, Air, and iMac, explaining the step-by-step process to set up a VPN connection on your device.

First, you have to choose which VPN service is best for you
There are a lot of VPN services available online like Surfshark, ExpressVPN, NordVPN, and ProtonVPN. Purchase any one of the paid VPN services or just use a free VPN service (Just Google it and find one. Mostly it's slow). I mostly prefer Surfshark VPN. Because it is a budget-friendly VPN service that offers a fast and stable connection.
3 Ways you can connect VPN in your MAC
- Add VPN information in Network Settings
- Install the VPN app for Mac (provided by the VPN company)
- Install Google Chrome Extension and just log in and connect to a server ( to only use VPN in the browser)
Method 1: To connect to a VPN on your MacBook, follow these steps:
If you want to add VPN on your Mac,
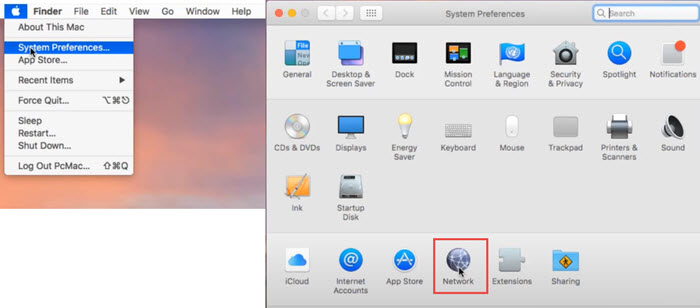
- On your Mac, go to System Preferences and click on the “Network” icon.

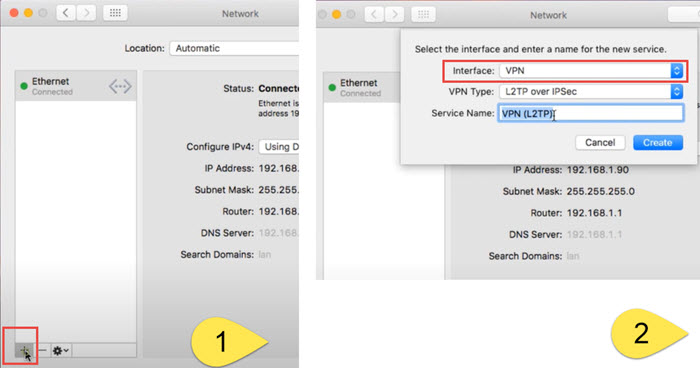
- Click on the “+” button from the bottom left corner of the screen (to add a new connection).
- Choose “VPN” from the drop-down list and click “Create”.
- Choose the type of VPN you will be using, such as PPTP or L2TP, or IKEv2.

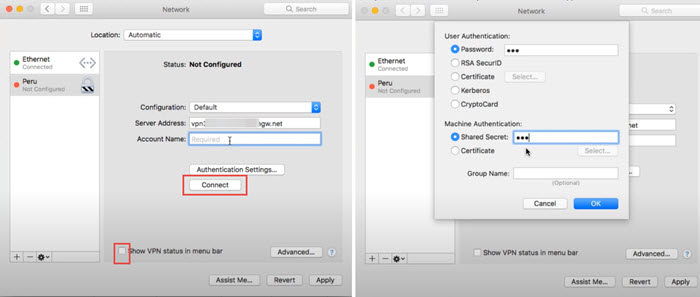
- Enter the server address and account information like username, and password provided by your VPN provider. Make sure to tick the “Show VPN in menubar” option.
- Click “Connect” to establish the VPN connection.
- Enter your account password if prompted.
- Once connected, your VPN status will appear in the status bar at the top of your screen.
- To disconnect from the VPN, simply click on the VPN icon in the status bar and choose “Disconnect”.
Method 2: Download the official VPN Software for your Mac system or mobile device
Most VPN companies offer their own apps to connect VPN on your device. If you are using Mac or Windows OS, you can download the app for that platform or if you just want to use VPN on your mobile devices, they provide the app for that device too.
These apps offer a lot of features like changing the country location, choosing a different IP address, and an easy way to connect & disconnect a VPN connection.
So just download and use these apps.
Method 3: If you just want to use VPN with your browser, use the Google Chrome extension
There are a lot of Google Chrome extensions available online to connect free or paid VPN services.
In this tutorial, I am using the Surfshark VPN extension.
- First purchase Surfshark VPN service. You will get login information.
- Then visit Surfshark VPN Google Chrome extension page and download that extension.
- Then Log in with your account information and connect to the server.
That's all now you can privately access the web.
I hope this guide has been helpful to you and that you enjoy a seamless VPN experience on your MacBook.